Thursday, January 24, 2008

Field trip #2

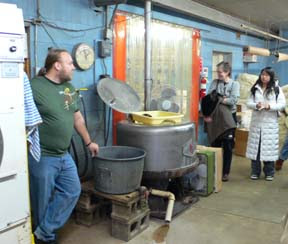
We visited the St. Peter Woolen Mill to learn about how wool is processed. I will let the students explain this to you in detail next week when they submit their papers, but for now here are the pictures. The mill is one of only three in the U.S. that will give you back the same wool you send in for processing. Customers drop off bags of wool like this:


The wool is washed in the metal tub with wool wash and hot water, put into the adjacent extractor to remove the water, and then tumbled in the dryer just visible in the left corner of this image:
The wool then goes through the picker and the carder, seen here:

We also stopped at Knit & Sew World, also in downtown St. Peter, for a demonstration of a knitting machine. I'll share a student's reaction paper with you next week.


Two students reflect on the trip to the Tangled Skein

Chris:

Our next trip was to The Tangled Skein, a local yarn store in St. Peter run by two moms who love to knit. It supplies the knitting enthusiast, or beginning student, with everything and anything needed for knitting such as needles, tiny silk yarn, jumbo size yarn, or patterns to make anything from a scarf to a sweatshirt. If you need some hands on help or someone to talk to while you knit then you can come to one of the classes they offer. For example, The Sox Pistols meet the second Sunday of every month right in the shop to work on their next sock knitting project. I was surprised to hear that the owners originally looked at Mankato as the location of their shop; it makes a lot of sense to open it in St. Peter. Of course there are more people in Mankato, but rent will be higher. For a privately owned hobby store it's best to be located where the interest is, and in this case it's St. Peter. First off, the store is in a historic building in downtown St. Peter and second, St. Peter is a retirement community. Two popular activities of retirees are golfing and knitting and since Minnesota only supplies three solid months of golfing, St. Peter should be full of knitters. The owners of the tangled skein also live in St. Peter and have friends in St. Peter, practically guaranteeing business. Finally, combine it with the growing popularity of knitting on college campuses, a class built entirely around knitting, and the stores convenient location nearby local college Gustavus Adolphus and you get the perfectly located hometown shop, The Tangled Skein.

Stephanie:

I thought it was useful to visit the Tangled Skein because it gave us the opportunity to learn about the store from one of the owners. I have been in the knitting shop before, but I was not versed in the reasoning behind the store or the products available for purchase. I now realize that the Tangled Skein is a store that caters to knitters who prefer to work with natural fibers rather than acrylic or nylon. Given this, they annually attend conventions to seek out new yarns from around the world. The layout of the store itself was also very logical with the yarns categorized by relative weights as well as by fiber used to create the yarn.

As a small, locally run store, I was impressed on the knowledge and friendliness of the owners as well as the helpers in the store. Not only were they able to tell us the name and background on any yarn available for purchase, but willingly gave advice on projects and suggestions on how to use different products. It is through this friendliness and openness to knitters, that they have become a valued member of the knitting community in St. Peter. Not only are classes offered, but groups will come in and knit at the table provided, demonstrating that this store has become fully accepted by the residents of the town.

A student's description of our visit to Cozy Acres Alpaca Farm

By Erin

Cozy Acres Alpacas is an alpaca farm in Le Sueur, Minnesota. Here, alpacas are bred, raised, and sheered in order to make yarn out of the alpaca fiber. This yarn is actually very different from the more common woolen yarns because the fiber from an alpaca is much finer than the fiber from a sheep. It creates a stronger, warmer, and softer yarn after it is processed.

Alpacas are a domesticated relation of llamas and they originated in the Andes. They are still raised there today but are also found in all fifty states. The animals are covered in hollow hairs which provide a great deal of insulation. Because of this insulation, alpacas are able to withstand relatively cold temperatures. They don't however, tolerate heat particularly well. In order to help the animals cope with the warm Minnesota summers, as well as to be able to produce yarn, the alpacas are sheered during May. This keeps them cool in the summer but also allows time for the alpacas to grow their coat before the cold fall weather. A few of the alpacas we saw today were also wearing coats in order to help them ward off the bitter cold winter weather.

Sheering the alpacas in May is only the first of three steps necessary for creating alpaca yarn. When the alpacas are sheered, the fiber is in its raw state. Typically, only the fiber from the blanket of the alpaca—from the base of the neck to the bottom of the tail and down the sides—is considered quality fiber. This fiber is crimped which creates a smooth yarn without fibers sticking out of the strand.

After the raw fiber has been sheered and sorted, the fiber is put into a carting machine for roving. Here, the fiber is wound around a wheel with spokes sticking out of it in order to align the hairs. After it has been turned in the carting machine, the fibers create a rope about an inch in width which is then ready for further processing.

When the fibers have gone through the roving process, they are spun on a spinning wheel in order to create the alpaca yarn. One of the women from another Minnesota alpaca farm actually spins her own yarn. Another option, which is utilized by Cozy Acres Alpacas, is to send the fiber to a mill. It can be difficult to find a mill able to produce alpaca yarn, however, because a special machine is needed to process the alpaca fibers. Larger mills will often combine alpaca fibers with other fibers, like wool, so that they are able to process it. The Shepherd's Mill in Phillipsburg, Kansas, which processes the fibers from Cozy Acres Alpacas, has the capability to create 100% alpaca yarn. The yarn is then sent back to Minnesota where it is wound into skeins for purchase.

Before visiting the alpaca farm, I was very interested to hear why this sort of farm would be in Minnesota. At first glance, it seems as though the climate would not be appropriate for these animals native to South America. While the extreme temperatures in Minnesota do present some challenges for the farmers, the open areas found in rural Minnesota are actually quite conducive for raising alpacas. The animals need plenty of space and, in order to produce soft yarn, also need dusty areas to roll in. The practically treeless farms found in this location provide this environment for the animals. Also, the alpacas on this farm eat hay and a grain mixture which is actually mixed at the local farmer's co-op. The appropriate nutrition for the animals is clearly available in this location making it a convenient place to raise them. Finally, as knitting has become more popular in recent years, the farmers have a large market in which to sell their high quality yarn.

Why we knit

I'm sure knitting is a relaxing hobby, but we've been feeling more like the cottage farmers who knit in every spare minute. In the past 2.5 weeks, we have completed three projects, a nice accomplishment for new knitters. Rather than knitting to clothe ourselves or to raise a bit of cash, the students are knitting for a grade and I am knitting for my full-time job. Today we look at some of the reasons why people knit.


The term craftivism combines the words craft and activism to describe the notion that engaging in crafting can be a way to make a difference in the world, whether it be charity knitting or political activist knitting. For some, it means making things that would otherwise be machine-made or come from a corporate sweatshop. Although craftivism is a fairly new word, it's not a new idea.


Knitting and charity work have a long association in the U.S. At least since the Revolutionary War, we have been knitting to clothe soldiers at war. The tradition continues today for soldiers in the wars in Iraq and Afghanistan. You can knit helmet liners, or knit hats and slippers for The Ships Project. Old soldiers are not forgotten; the Knit Your Bit campaign of the WWII Museum collects scarves for veterans.


If you prefer to knit for peace, you can choose from a variety of organizations that collect handknit items for children, orphans, homeless, elderly, or animals. Adoptions Together ships items to orphans in Eastern Europe. Afghans for Afghans collects items for children and adults in Afghanistan. Warm Woolies supplies orphanages in Russia, Mongolia, Kazakhstan, China and South Dakota. You can knit or crochet for the Pine Ridge Reservation, South Dakota. The Snuggles Project collects security blankets for shelter animals. College-bound foster kids can receive handknit scarves through the Red Scarf Project. Warm the World provides blankets, hats, and scarves to kids in need, and collects hats for soldiers. Warm Up America collects afghans or parts of afghans for distribution, but also encourages people to find agencies to which they can directly donate afghans. You can make a Christmas stocking for Navajo children or elders through the Adopt-An-Elder program. You can also support Peace Fleece.


Political activists can find an outlet in knitting as well. microRevolt is collecting knit or crochet squares of the Nike blanket to serve as a petition for fair labor standards. You can send a message with your testimony about the Iraq war to your senator along with a helmet liner through the Stitch for Senate campaign. Graffiti artists can switch from spray paint to knitting and join Knitta with members who tag utility poles and more with knit objects.


Many knitters today knit for the satisfaction in creating the object and to promote our ability to make things for ourselves rather than just buy them. This is reminiscent of the Arts and Crafts Movement of the late 19th century and early 20th century, which was a reaction to the Industrial Revolution. Believing that a healthy society needed skilled craftsmen and creative people, supporters preferred handmade objects to those made entirely on soul-less machines. This movement has never entirely died out.


Even if you can't knit, you can support knitters through the donation of materials or the purchase of handmade objects. You can donate yarn and needles to the Hennepin County Home School, which is teaching non-violent juvenile offenders to knit to make amends. You can buy yarn for Navajo weavers through the Adopt-An-Elder program. Buy handmade products from around the world through Economic Development Imports, Lantern Moon, Rosie's Place, Snow Cabin Goods, Kenana Knitters, and Etsy.


What are your reasons for knitting or buying handknit items?

Wednesday, January 23, 2008

Show and tell mittens

Hard work pays off in a great set of mittens:
Michele, Stephy, Whitney, Alyssa, Amanda, Lynn, Ashley, Cassie, and Chris give you a closer look:


Knitting in Estonia

We had a lively discussion of Bush’s Folk Knitting in Estonia (see inside), a book that is well suited to our geography of knitting class. Estonia was variously conquered and controlled by Denmark, Germany, Russia, Poland, and Sweden, came under Soviet Control in 1940, and declared final independence in 1991. The oldest knitting in Estonia was found in a grave dating to the 13-14th century, placing it within the range of the oldest knit materials found anywhere in Europe. It may have been introduced to Estonia by the servants of Crusaders brought back from Palestine with knitting skills intact. The patterns in Estonian knitting must have been influenced by all these cultures and we tried to identify some of these influences in the samples seen in the book. Like many of the other regional designs we’ve seen, the knitting patterns, which are often linked to specific places in Estonia, likely evolved from or were inspired by other textiles, plants, and animals.

Knit items appear in Estonian culture in many ways – as practical clothing, gifts, or talismans. Again, people in a cold climate benefit from two-color designs that create a thicker fabric, but the designs incorporated into the items often had another purpose – to ward off the evil eye, to avoid corporal punishment for a crime, to ensure the birth of a son. A woman who accepted an offer of courtship from a man would return a pair of mittens tied to an empty bottle of liquor (the full bottle being a gift from the man to the woman and her family). A bride might need fifty pairs of mittens in addition to stockings and belts to give to various members of the bridal party and the groom’s family, many of these mittens being laid on the thresholds that she crossed as her mother-in-law gave her a tour of her new home.

We talked through one of the patterns so that students could learn the important aspects of pattern reading such as how to decode abbreviations, substitute yarns, and adjust patterns or needle sizes to their own gauge

Tuesday, January 22, 2008

Finishing the mitten

The last step in the mitten is the thumb. Put the stitches that are currently on the piece of yarn back onto your needles - either the two circulars or 3 double pointeds. Join a new piece of yarn at the joint between the thumb and hand and knit the first round.
At the end of this first round pick up a stitch in the corner.


Continue knitting rounds until the thumb section reaches to the middle of your thumbnail and begin a 3 point decrease
(total number of stitches / 3) - 2 = X
knit X stitches, knit 2 together around then
knit X-1 stitches, knit 2 together and continue with one less stitch before the decrease until you have between 6 and 10 stitches depending on the weight of your yarn. Cut the yarn and thread through the remaining stiches, pull tight and fasten.


You can use the end of the joined thumb yarn to sew close any holes at the thumb-hand joint.

Textured knitting

Just as the two-color knitting on which we have been working creates a thicker, and therefore, warmer fabric that is good for the cold climates in which it is often used, so too does the addition of texture create a thicker, warmer knit. In two-color knitting the strand that is not being knit is carried across the back until it is needed on the front, except in Armenian knitting where the strand is trapped in the knitting every few stitches allowing the carried color to be seen through the front. Armenian knitting, as described by Swansen & Williams, may not have developed in Armenia, but it was used by the Armenian immigrant hired by Elsa Schiarapelli to knit her sweater designs in Paris. The second color is used throughout the sweater, knit at the front where needed in the design, but carried and caught up in the main color even where it is not used at the front, so even in areas of a single color the second color continues to keep the fabric thick.

Tvaandstickning, a technique from Dalarna, Sweden, also uses two strands of yarn throughout the knitting; these can be the same color or two different colors. The two strands are twisted after every stitch so that you are constantly switching the yarn being used at the front. This is not the same as carrying one yarn across the back; you must twist the strands even though this twists up the yarns you are using. It is simple enough to stop at the end of the row and hang your knitting by the strands to let it unwind. The effect is to create a fabric that looks very similar to nalbinding on the wrong side of the knitting – like a ridge along the purls (seen in photo on right side). In some places, as in Norway, the “wrong” side is worn on the outside. I used two strands of a sock yarn to create the mittens seen below using a pattern in Threads magazine. Other patterns for tvaandstickning can be found in Dandanell & Danielsson and Ling. When using two different colors, stripes are created as you switch between the two strands. Bringing one of the strands to the front and carrying it across the front will create the surface designs known as krokmaskor (seen in photo on left side).

We’ve already seen that surface textures created by mixing knit and purl stitches have been used since the 16th century. This same technique has been used since at least the Victorian era to create patterns on fishermen’s sweaters, or jerseys. Named for the island of Jersey in the Channel Islands, the square-shaped higher straight-neck jerseys are called ganseys or guernseys after the other Channel Island, Gansey, and are tightly knit in the round to avoid the weakness of seams and provide better protection against harsh weather. Each fishing community apparently developed a unique pattern for ganseys that could be used to identify the bodies of drowned fishermen who later washed up on shore. Flamborough Marine Limited still makes handknit ganseys and regional patterns can be seen at their website.

This same idea, a unique regional pattern used to identify the bodies of drowned men, persists for knitting from the Aran Islands of Ireland, as well. If you are of Irish descent, you might find your clan’s Aran pattern at The Aran Sweater Market. Consisting of more complex cabling than a typical gansey, Aran patterns are reminiscent of Celtic knots, of course, and each type of cable is representative of some aspect of life in a fishing community – fishermen’s ropes, seaweed, cliffs, etc. Although legends about the origins of Aran knitting persist in claiming that the techniques date back to around 800 A.D. based on images in the Book of the Kells, the first Aran sweaters photographed date to the 20th century. The rumors of an ancient origin may have been just a marketing technique according to Starmore.

Monday, January 21, 2008

Making sense of mittens

After you knit the cuff and after you increase to accomodate your hand, you can knit a couple rounds in your pattern and then begin increasing for a normal thumb gusset. I set up markers near the beginning of the palm row for a right mitten as: knit 1, place marker, make 1 stitch, knit 1, make 1, place marker (reverse that at the end of the palm row for a left mitten - shown in first photo).

I increase two stitches every other round until I have enough thumb stitches between the markers to accomodate my thumb:
(circumference of thumb + 1/2 inch) X number of stitches per inch in gauge swatch for stockinette stitch

For me this was (2.5 + .5) inches X 7 stitches per inch = 21 stitches.

So when I had 21 stitches between the markers (photo 2), it was time to place the thumb stitches on a spare piece of yarn (photo 3). So knit the stitches before the marker, thread the stitches between the markers onto the yarn needle, cast on one stitch using the e wrap cast on, then continue knitting the remaining stitches on the row. Now continue knitting the palm and back of hand in your pattern. It should look like the photo below.


Keep knitting until the mitten is just past your pinky (Cassie's green mitten is almost there) and then start decreasi
ng at the beginning and end of both the palm side and the back of hand side: knit 1, SSK, knit to 3 remaining, knit 2 together, knit 1. You can decrease every round or every other round or whatever it takes to get you to the tip of your fingers with anywhere between 8-15 stitches left (8 if worsted weight, 15 if chunky yarn). Cut the yarn, thread through remaining stitches, and fasten. Thumbs tomorrow.

Sunday, January 20, 2008

Mitten progress report

After creating and measuring the swatches of ribbing, cable, and stockinette, students determined how many stitches they should cast on to do the ribbing for their wrists. Barb helps Jonas, at right, to get the hang of knitting on two circulars after the cast on.

Once they reached the length of the cuff they wanted, most had to increase (mostly using make 1) to get enough stitches to fit the width of their hand with the cable that they had chosen for the back of the hand and stockinette stitch across the palm. Alyssa and Lindsay are at this point below.

Cassie tries to overcome the tightness of the cable she has chosen. I recommended that she try to avoid creating stitches at the tips of her needle. Although she is completely new to knitting, her mitten is coming along beautifully and she is looking forward to showing it off to her knitting mother and sisters.


Friday, January 18, 2008

The knitting goes on

Learning to knit a hat in the round on a 16 inch needle is a piece of cake. Learning to knit on a set of double pointed needles is like having a piece of cake but not having a fork or even fingers with which to eat it - it's awkward. I prefer knitting on two circular needles and have given students the choice to learn this style or use the double pointeds. Even knitting on two circular needles takes some practice and care to avoid twisting the rounds. After a bit of practice on small rounds students learned to or, using diagrams, taught themselves to cable. It is a surprisingly easy process and they all seem to have caught on quickly.

Now the swatching for the mittens begins. Students are making flat swatches with a bit of the ribbing they will use for the cuffs, a bit of the cable they have chosen from a couple of the stitch dictionaries I have provided (referenced at the right), and the stockinette stitch they will be using on the palm. Both Liz and Chris are at this step.


Erin, probably my most experienced knitter, is well into the knitting of the mitten, which matches her two-color hat.


Thursday, January 17, 2008

Show and tell hats

Students modeled their hats today and talked about the design that they chose. Lynn's hat (green/white) is inspired by a sock design. Amanda's line of waves (red/brown) is seen in both Fair Isle and Andean patterns. Ashley's heart (black/blue) is created using an intarsia style technique for knitting in the round that is used in Andean knitting. Mary (purple) hate the colors of her hat, but technically, it's quite a good hat.


Wednesday, January 16, 2008

Supplies for the third project

The third project is a cabled mitten. The requirements are that it must fit your hand and have a cable - even if it's just crossed once. You will need about 220 yards of any yarn of your choice and needles that fit the size of your yarn. You can use either two circular needles or a set of double pointed needles.

Here are the general directions (I'll help you fill this in as we go along):

Take the following measurements:
Circumference of wrist ___________
Desired length of cuff ____________
Circumference of hand at widest part (not including thumb) ____________

may want to add an inch or so to this measurement – mittens should be loose fitting
Distance from wrist to top of web of thumb _____________
Circumference of thumb __________
may want to add ½ inch or so to this measurement to get loose fit
Distance from wrist to pinky tip ___________
Distance from wrist to tip of longest finger _____________
Distance from thumb web to middle of thumb nail and to tip __________ & _________

You need to knit swatches for ribbing for wrist, cabling for back of hand, and plain for palm

When you have measurements and gauge you can start mitten filling in numbers to fit you:

First cut a 12" strand of yarn to save for the thumb gusset.

Wrist:
Cast-on ______ stitches and work ribbing for _______ inches.

Hand:
Increase to _____ stitches on next round.
Work three rounds using your design for palm and back of hand.
Begin increasing for thumb gusset on next round (normal gore)
For right mitten – increase at beginning of row
For left mitten – increase at end of row
First increase row: Knit1, PlaceMarker, Make1, K1, M1, PM
Follow each increase row with a plain row of knitting
Following increase rows: Make1 after 1st marker and M1 before last marker
(on each row you are making two new stitches between markers and knitting the stitches already there)
When thumb gusset is desired number of stitches, work straight to _________ inches.
I like for thumb gusset to be an even number of stitches to make decreasing neater.
At end of thumb gusset, put thumb stitches on extra strand of yarn.
Cast on 1 stitch using e or backward loop or single method cast-on.
Continue knitting palm and back of hand until knitting reaches just above the tip of your pinky.
Start decreasing here: K1, SSK, knit until 3 stitches left on row, K2tog
can decrease every row or every other row depending on how long you want mitten
for my stubby fingers I decrease every row – try it on as you go
Work decrease rows until you have about 10-12 stitches left for to desired length to finger tip.
Cut yarn leaving enough to weave through remaining stitches, pull tight and fasten.

Thumb:
Put thumb stitches back on needles.
Knit across thumb and pick up one stitch from mitten body.
Continue knitting until thumb reaches middle of your thumb nail
Start decreasing here using 3 point decrease:
Total number of stitches minus 2 = X
First round = KnitX, K2tog
Second round = Knit X-1, K2tog
Decrease until you have 6-8 stitches or desired length to thumb tip, then end as for hand.

Class update

Almost all the hats were finished today. We will do the show and tell for them tomorrow.

Those students who were ready moved on to learning to knit in the round on two circulars or a set of double pointed needles. It takes a little practice to keep track of all the needles, but once they felt like they got the hang of it, we started cabling. I gave them a diagram of the procedure and talked them through it. They went home with instructions to continue practicing in the round and cabling.

They will also begin a swatch for the mitten – our third project. Supplies and instructions in a separate post.

Tuesday, January 15, 2008

Field trip

It was a warm day in sourth central Minnesota - about 20 degrees F - so we got out of the classroom and toured an alpaca farm and our local yarn store. Unfortunately I forgot to bring my camera, but you can take a virtual tour of each place by following the links. Students are writing reflection papers so I will be brief and share the best papers with you next week.

Kathy and Tyler Erlandsen hosted us at Cozy Acres Alpacas, one of about 80 alpaca farms in Minnesota. I'm using yarn from their animals Myste and Prim for my hat - it's incredible stuff, like nothing else I've ever used, soft and clean, has a nice sort of shine, and a smooth feel. It's a pleasure to work with it.

Our local yarn store is The Tangled Skein, owned by Lori Witzel and Annette Engeldinger. With a population of only 10,000, St. Peter is very lucky to have such a place; it has a friendly and helpful staff and a great yarn selection.

More to come from the students' perspectives...

Monday, January 14, 2008

Hat progress

Work on the hats continues. Students are knitting in the round for the first time and enjoying the fact that they don’t have to purl. Most students have found the color-stranded technique so easy that they are putting in more rows of two-color knitting than they had first planned. I have given students a couple options for ending the hat, decreasing or no decreasing.

If you don’t want to decrease, you just knit until the hat fits your head, cut the yarn leaving 12 inches or so, thread that through the remaining stitches, pull tight and fasten. I found this on hats in Knit Your Own Norwegian Sweaters (referenced at the right). You have to add a pompon to cover the hole in the top because it will not cinch completely closed with so many stitches.

A simple decrease is the spiral. Six spirals give you a flattish top. Take the number of stitches and divide by the number of spirals you want, and then subtract two. For example, if you have 120 stitches the math is 120 / 6 = 20 – 2 = 18. Start decrease rounds when the hat fits up to the point where your head starts to curve. When you’re ready to decrease, knit 18 stitches then knit 2 together, repeating this all the way around. On your next decrease round work one less stitch before you knit 2 together and continue to step down in that manner. Generally, if you want a tighter fitting cap, decrease every row; if a taller hat, decrease every other row, knitting a plain row in between. For a stocking cap, you can knit several rounds between decreases. Work until you have about 10 or so stitches, cut the yarn leaving 6 inches, thread through the remaining stitches, pull tight, and secure the end of the yarn on the inside of the hat.

Two hats are done, like this one that belongs to Stephy, a sophomore from Guangzhou, China. She used the decrease option but worked a double decrease similar to hats in Poems of Color, rather than knit 2 together she slipped 2 stitches as if to knit, knit 1, then passed the slipped stitches over the knit stitch. This gives straight decrease lines rather than spirals. The color work comes from 2 shades of Noro yarn with various designs drawn from Fair Isle patterns.

Show and tell bags

The bags are done, and after today’s quiz over last week’s material, students talked about their choice of color and size. Most bags still need buttons or other closures, and we can add those after bags dry as students desire.

Friday, January 11, 2008

Supplies for the second project

For Project 2 students will create a hat to fit their head with at least one row of knitting that uses two colors. This will require a total of about 200 yards of the yarn of your choice in any two colors. You might need more yarn if you are making a long stocking type cap. Both colors should be the same weight of yarn (i.e. worsted or bulky, for example). Designs on this type of hat generally look better in a finer weight yarn such as DK or sport, however, it's generally easier for a beginner to work in worsted than in the finer yarns. Get needles to match the yarn weight - look on the yarn band for suggestions. You will need EITHER two circular needles of the same needle size with one being 16" long (the other can be any length) OR one 16" circular needle and a set of double pointed needles of the same needle size OR one 16" circular needle. The last option limits your choices for ending the hat.

I have several sample hats to show students design, color, and decreasing options. Students in class were able to look for design inspiration from the library of books of traditional knitting that I have accumulated since deciding to teach this class a year ago. These are listed in the sidebar to your left. Students are charting their own designs on graph paper. Most of the slower knitters were encouraged to choose from the peerie designs of Fair Isle knitting, while the more experienced knitters are taking on bigger designs.

Making a sample swatch to check your gauge and determine the circumference of your hat:
I'm having students cast-on 20 stitches to create a flat swatch even though they will be knitting the hat in the round. The first inch of the swatch is the chosen brim technique - stockinette stitch to create a rolled brim (required of the slower knitters) or K1 P1 or K2 P2 rib. This is followed by a couple rows of knitting in the background color, then rows of the color design. Using the gauge swatch determine the number of stitches to an inch (call this number X). I'm having most students use the gauge of their plain knitting since they will only have a row or two of color. Measure the size of your head (Y). Multiply X by Y to determine the number of stitches to cast-on. This can be adjusted to allow for a complete repeat of the design. Although ribbing will have more stitches to the inch than the color or plain knitting, it will stretch well enough to accomodate the difference.

Knitting progress report

Students are at different stages of the first project. Chris and Katie work on straps for their bag. We are using the I-cord with 4 stitches. Working on double pointed or circular needles, cast-on 4 stitches, knit every row without turning the work - that is, at the end of a row, push the stitches to the other end of the needle and knit by bringing the yarn from the last stitch on the left to the first stitch on the right.


Mary and Whitney sew seams using the mattress stitch.


Several students have started the second project - a multi color hat (details in another post).
Kathy and Stephy search for designs to add to their hats. Michele gets some advice on her swatch from Barb, the fabulous mathematician/knitter who has been joining us to help teach the knitters.


Latvian & Andean knitting

I’m relying on Upitis and Gravelle Lecount (full reference in Knitting Books list) for this short section that focuses on color and design in Latvia and the Andes.

As we saw with knitting from Fair Isle, the Faroe Islands, Norway, Sanquhar, and Bohus, color and design were traditionally associated with a particular place. Some designs and color combinations might start in a single place, like the mittens of Selbu, and then come to represent the entire country. In other countries the designs and colors in knitting are specific to a particular district.

The organizers of the 2006 NATO Summit held in Latvia have created a website that shows the 4500 Latvian mittens that were handknit for the guests of the summit by knitters from around the country. The mittens are organized by region into men’s and women’s style. Mittens for men are usually in more subdued colors than women’s mittens. Traditionally the color combinations and symbols of a mitten would identify the wearer as a member of a district, with some features such as a scalloped cuff being specific to a single township.

The same is true for knitting of the Andes, particularly Bolivia, Peru, and Ecuador. Bright, complex designs are regional creations used in hats, bags, stockings, armbands, etc. Traditional knitting is done for both personal use and for sale. Knitting is done very rapidly by knitting from the purl side of the fabric with the yarn wrapped around the neck and the thumb is used to wrap the yarn around the needle. Many of these knitters are men; however, whether men or women of a community do most of the knitting varies by place. For example, some areas of Peru may have only male knitters with women doing weaving or spinning. Much of the fiber comes from llama and alpaca.